|
Summary: Stone polishing requires a controlled step-by-step process using professional diamond pads. The process begins with coarse grits, which workers use to achieve an even transition to the final fine grits. The process needs essential elements, which include correct pressure levels, appropriate water usage, and complete grit sequence application. The process needs essential steps for proper execution, which guarantee enduring high-quality results through correct execution. |
Stone polishing isn’t about shine. It’s about control.
Every pass with a pad changes the surface. Done right, it removes scratches and builds a clean finish. Done wrong, it can damage the stone.
There’s no shortcut here. The result depends on how well you follow the process—and whether the stone polish pads you’re using are built for consistent performance.
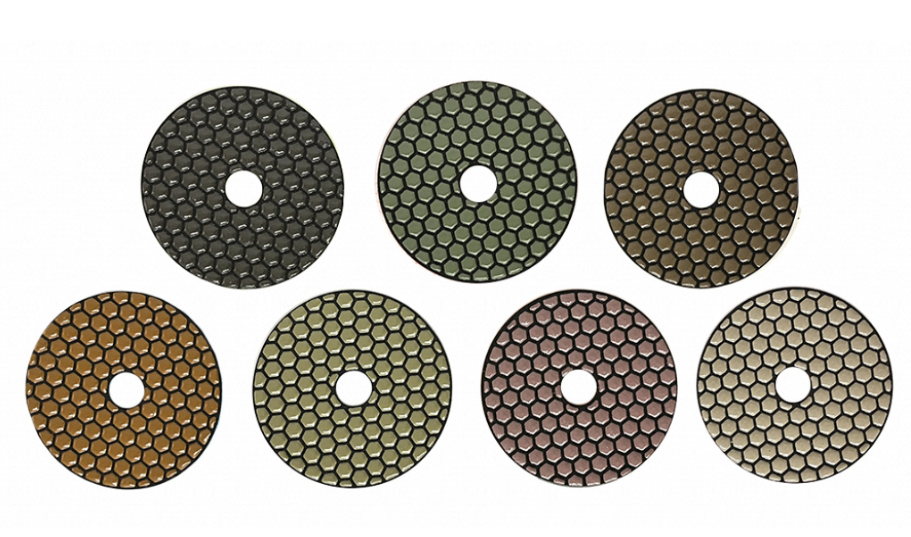
Understand What Professional Polishing Pads Actually Do
Before starting, understand the tool.
Stone polish pads available from Tait Sales are diamond-based and designed for progressive refinement. They don’t “polish” in one step. They cut, smooth, and refine in stages.
Typical sets include:
- Coarse grits for surface correction
- Medium grits for smoothing
- Fine grits for finishing
- High grits for final polish
They are usually available in wet or wet/dry configurations, built to handle materials like granite, marble, and engineered stone.
Why it matters:
You’re not using one pad. You’re using a system. Each pad depends on the previous one.
Step-by-Step Guide to Polishing Stone with Professional Pads
Step 1: Start With a Clean, Stable Surface
Before touching the stone with a pad, clean it.
Remove:
- Dust
- Slurry residue
- Loose particles
Any debris left on the surface will drag under the pad and create scratches.
Why it matters:
Polishing can correct surface damage, but deeper defects require proper coarse grinding before refinement. It refines what’s already there.
If the surface starts dirty, every step after carries that problem forward.
Step 2: Choose the Correct Starting Grit
You should begin your work at the appropriate level for your current ability.
Begin your work with coarse grit, which typically starts at 50 or 100 when the surface shows saw marks and rough edges, and visible scratches.
Polishing pads begin their process by using aggressive cutting methods, which they follow with more precise material removal techniques.
The reasons for its importance.
- Starting too fine wastes time
- Starting too coarse removes unnecessary material
- The wrong starting point affects the entire finish
The appropriate grit must be matched to the current surface condition because guesswork shows unreliable results.
Step 3: Work the Surface Evenly
When you start polishing, keep movement consistent.
- Move in controlled passes
- Don’t stay in one spot
- Maintain even pressure
Professional pads are designed to cut evenly when used correctly. Uneven pressure leads to an uneven finish.
Why it matters:
- Holding a position creates low spots
- Uneven passes create visible patterns
- Inconsistent pressure affects polish quality
The goal is uniform removal—not speed.
Step 4: Follow the Full Grit Sequence
This is where most people fail.
You must move through the full grit progression without skipping steps.
Typical sequence:
50 → 100 → 200 → 400 → 800 → 1500 → 3000
Each pad removes the scratches from the previous one.
Why it matters:
- Skipping grits leaves visible scratches
- Later stages won’t fix earlier mistakes
- Final polish depends entirely on this sequence
If you rush here, the finish will show it.
Step 5: Use Water for Cooling and Consistency
Most professional stone polishing pads are designed for wet use.
Water controls heat and keeps the cutting surface clean.
How to use it:
- Keep a steady flow
- Avoid dry spots
- Don’t flood the surface
Why it matters:
- Reduces heat buildup
- Prevents pad glazing
- Improves cutting consistency
Running pads dry increases friction and reduces lifespan.
Step 6: Control Speed and Pressure
Polishing isn’t about force. It’s about balance.
Too much pressure:
- Wears pads quickly
- Creates an uneven finish
Too little pressure:
- Slows down progress
- Leaves incomplete refinement
Why it matters:
These pads are built to cut efficiently under controlled pressure. Let the diamonds work. Don’t force the process.
Step 7: Check the Surface Before Moving On
Don’t move to the next grit just because time has passed.
Move forward only when:
- Scratches from the previous grit are gone
- Surface looks consistent across the area
Why it matters:
If you move too early, those scratches stay all the way to the final polish.
You can’t fix them later.
Step 8: Handle Edges and Corners Separately
Flat surfaces are straightforward.
Edges are not.
Use:
- Flexible polishing pads
- Smaller diameter pads
- Controlled hand movement
Tait Sales offers stone polish pads designed with flexibility to handle edges and contours without damaging the surface.
Why it matters:
- Edges show inconsistency faster
- Over-polishing rounds edges
- Poor control leads to visible defects
Treat edges as a separate step, not an afterthought.
Step 9: Finish With High Grit Pads
Once you reach 1500 or 3000 grit, the surface should already be smooth.
The final pads don’t fix issues. They refine the finish.
At this stage, you should see:
- Even reflection
- No visible scratches
- Smooth surface texture
Why it matters:
If the earlier steps were done correctly, this step is quick.
If not, no amount of high-grit polishing will fix the surface.
Step 10: Clean and Inspect the Final Surface
After polishing:
- Clean the surface completely
- Remove all residue
- Let it dry
Then inspect under proper lighting.
Look for:
- Swirl marks
- Dull patches
- Missed areas
Why it matters:
The final check shows the real result—not what it looked like during polishing.
Step 11: Seal the Stone if Required
Polishing improves appearance. It doesn’t protect the surface.
Apply a sealant where needed to maintain the finish and prevent staining.
Why it matters:
- Protects polished surface
- Maintains long-term appearance
- Reduces maintenance effort
Skipping sealing reduces the lifespan of your finish.
Final Thought: The Process Is the Result
Stone polishing doesn’t depend on one step. It depends on all of them.
The pads matter. But how you use them matters more.
Tait Sales & Consulting LLC offers professional-grade stone polish pads that deliver consistent grit progression, long-lasting durability, and stone cutting performance across various stone types. The correct set must be selected while the process needs to be followed through all its steps, because this method produces a durable, clean finish.
FAQs
1. What grit should I start with?
You should begin with either 50 or 100 grit, based on the roughness of the surface.
2. Can I skip polishing steps?
The process requires all grits because skipping them will create scratches that will remain visible in the final finish.
3. Do I need water while polishing?
Water serves as the recommended solution for most stone polishing work, especially when using diamond pads.
4. How do I know when to move to the next grit?
The switch to the next grit occurs after all scratches from the previous grit have been eliminated, and the surface appears level.
5. Why is my stone not getting a proper shine?
The most common reason for this issue is that people fail to complete all grits and apply uneven pressure while executing their polishing work.